-1.png?width=800&height=1140&name=Untitled_Artwork%20(20)-1.png "Fishyfather")
(This tutorial is mainly about insects, but a lot of this can be applied generally to arthropods)
Video Tutorials/Examples for Visual Learners:- Moth Pinning/Framing
- Large Tarantula Pinning
- Small Beetle Pinning
Restoring Broken & Discolored Beetles
Supplies for Pinning
- 70% Isopropyl or Ethyl Alcohol
- Plastic or Glass Containers w/ Lid or Plastic Wrap (sized to the bug you're pinning for relaxing)
- Foam/Balsa Wood Boards (at least 1" thick, the thicker the better)
- Pins (can be insect pins specifically, or stainless steel sewing pins)
- Wax/Parchment Paper (for wings)
- Tweezers
- Scissors
- Cyanoacrylate Glue ("super glue") or E6000 Glue
- Acetone (for degreasing and cleaning if needed)
- Borax and/or Silica (for quick drying and stink reduction in larger specimens)
Supplies for Framing
- Shadowbox Frame (or whatever container you are using, like a bell jar, or display box)
- E6000/Hot Glue/Archival Glue
- Pliers/Wirecutters
- Foamboard (1/8"-1/4" thick)
- Archival paper (for background, whatever color you want! I also sometimes use fabric for this, although it can fade over time.)
- Any other mounting supplies if not using a frame, like mosses, branches, wire, etc...
PREPPING YOUR BUG
Step 1: Acquire your bug(s)! These can be fresh, dried, preserved (in alcohol), or frozen specimens. If you don't want to work on your specimen right away, there are a few different ways to store them. The best way to prevent damage during storage is to freeze your specimen in a plastic bag or container, well sealed to prevent freezer burn. You can also dry your specimen using silica or dry air, and store them in a sealed container once dry, rehydrating them later.
I personally store a lot of my bugs in rubbing alcohol, as this keeps them wet, and I typically don't need to relax them prior to pinning if I use this method. Alcohol storage is very common for entomological specimens, but it can impact color (especially non-structural pigments) and cause brittleness over time. I also never keep moths/butterflies or anything with a lot of fuzz in alcohol, as it can be very difficult to refluff them, or cause the scales on wings to become damaged.
Many insects available online for pinning are often euthanized for pinning purposes, especially butterflies and moths due to the degradation that occurs with their wings during a full lifespan. If this does not align with your values, there are more ethical suppliers out there, like people who breed insects and allow them to pass naturally before selling for pinning purposes.
Alternatively, you can always keep a bug friend yourself, and pin them when they pass. Keep an eye on the ground- I have found a lot of really nice specimens that have died naturally, perfectly intact, while walking around, even in urban areas!
 Step 2: Relaxing the insect (if dry or sometimes frozen) is very important to ensure you can articulate their body parts without them being too brittle and breaking.
Prepare an airtight container with enough hot water to fill the bottom and a dash of 70% alcohol (this prevents mold). Place your specimen on something that will keep them from sitting directly in the water when you close the container (especially if they're fuzzy!).
I like to use styrofoam or a small lid because they float. I generally leave the insect to "steam" for at least a day if they're smaller, up to 3 days if they are quite large.
If relaxation is slow going, you can refresh the water with new hot water as many times as you'd like. It's also possible to steam them over a pot of boiling water if you're impatient, but be careful, as it can be stinky! It can also get your specimen fairly wet, so fuzzy bugs aren't the best to use in this case.
As mentioned above, you can put specimens directly into 70% isopropyl alcohol and store them indefinitely until pinning. The alcohol preserves them and softens them initially, so you can pin them immediately after removal from the solution. I have kept beetles in jars for months to years until I was ready to pin them, and it has worked very well for me, but it can cause brittleness over time. Keep in mind that alcohol can cause discoloration/depigmentation. Structural pigments (like those found in beetle shells) hold up well in alcohol; non-structural chemical pigments will often bleach (like carotenoids).
I DO NOT recommend placing animals with any fuzzy/hairy parts directly into alcohol, especially butterflies and moths, due to the fur becoming matted and extremely difficult to brush out once it becomes wet. Butterfly and moth wings will become like wet tissue and be even more delicate/susceptible to tears and scale sloughing. Acetone is typically used instead to remove mold from lepidopteran specimens, and sometimes to preserve color in all types of specimens too!
PINNING
Optional Step 0: Once your bug is soft and relaxed, it's almost time for pinning! However some larger insects and most arachnids need to be stuffed so their internal organs don't rot and cause problems like leakage or discoloration, or in the case of arachnids and soft bodied insects, cause their body to shrivel due to their softer exoskeleton.
Organ removal is a slightly more complex process and entails creating a small incision in the underside of the abdomen, using q-tips and tweezers to remove and clean out the body cavity, and cotton wool, foam clay, or another stuffing substance to fill the empty space (especially important with arachnids).
I use super glue to close up the incision carefully. Once this is done, the animal can then be fully articulated into the position you want. In some cases, stuffing your bug is really up to personal preference and drying time.
A stuffed insect will often dry much more quickly than one with organs left in, but you're also left with an incision that can be tricky to hide. I like using borax for larger specimens that tend to have more "meat" to reduce smell during the drying process.
Step 1: Lay out your foam platform for pinning. A whole bunch of small pieces of various thicknesses to help prop up wings and other body parts when doing more complex pinnings is helpful.
 In some cases, especially when pinning with wings extended, a divet in the center of your foam can be helpful to keep the insect body lower than the wings so that you can work with them on a flat surface. I prepare all of my pins and wax paper that I need during this step as well.
Here is an example of a moth with different heights of styrofoam creating a lower spot for the body to rest, and higher levels for the wings to rest.
Step 2: It's time to put in the only pin that will actually go through the bug's body, but this also isn't 100% necessary. This pin will be used to anchor the bug to the foam board, and later to your frame or diorama. The placement can vary, and there are a lot of opinions about where the pin should go. I personally prefer to put the pin through the center of the thorax, but be careful that you don't push it through at an angle and pop out a leg.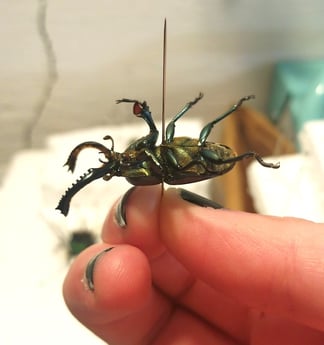
For beetles, the pin is traditionally placed through the right side of the abdomen for morphological study, although I prefer my pin to be centered for artistic applications. I have broken a few specimens by pinning through the point between the thorax and abdomen, as this is the weakest spot, although they have held up fine once glued back together.
Once you put the pin in (or before), you will want to untuck all of the legs that are folded beneath the insect, and then pin them to the foam board. If you don't want a pin through your bug, you can use pins to anchor the body of the bug to the board. I usually use 2-4 pairs of pins, one at the head, one at the booty end, and then two around where the abdomen connects to the thorax. This is a little trickier and requires very tight pinning to achieve stability.
Step 3: This next step is all about aesthetics and preference. You will be positioning all of the legs, wings, and antennae using tweezers, pins, and wax paper (for wings). You never need to pin through the body parts, you're just using the pins to hold everything in place by placing them around the animal.
I like to place two pins on either side of the head, and another set around the body to keep them centered and so they don't shift when you pull on other body parts. For limbs, I usually place pins at an angle in an X position to hold down the feet and legs. I use a combination of tweezers and pins to move around the body parts to position them perfectly. Sometimes I use pins to hold things in place and then later remove those pins if they are no longer needed or getting in the way.
 Wings can be sandwiched between two sheets of wax paper, or under one sheet pinned to the board, so that they lay fully extended. I pin around the wings to ensure there are no holes in them. If you do pin through the wing, only do so at the very top of the wing where it is the thickest so the wing doesn't tear. If you don't pin through the wing, they can shift slightly and push against the pins on the bottom edge, causing a little notching, so be careful about this and readjust as needed.
Step 4: Once your bug is fully positioned, it's time to dry! Drying time varies greatly depending on the size of the animal you pinned. Tiny bugs can dry fully in a few days, but I usually give my bugs at least 2 weeks of drying time before framing. Very large bugs may need even more time than this, so waiting is always the safest option.
Desiccants, dehumidifiers, and dehydrators can help speed up the drying process too! Be sure to store your bug in a dry, pest-free area during this time. Ants (👿) will find a specimen and devour it, as well as mites and other little pests.
Step 5: Once your specimen is dry, it's time to very gently remove all of the positioning pins. Leave the central support pin in for framing if you chose to do this.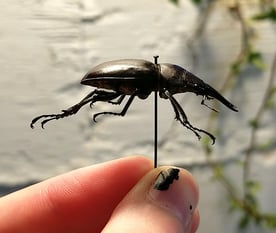
FRAMING
(This is for shadowbox frames, although some of these techniques can be applied to other display methods too!)
Step 1: Cut your thin foam board to the size of the frame backing. You can use the foam board itself as a back, or glue to board onto the frame back. Pay attention to the depth of your frame because gluing the foam board to the backing can reduce depth and squish your specimen once the back is put on. I broke a crab this way, never again!!!
Step 2: Cut paper to backing size and glue it to the foam board. This is optional! I sometimes just use the foam board color as the background, but if you want a different color, get yourself some fun paper! Acid free/archival paper is ideal for projects that you want to last a very long time. I also really like using fabrics as a backing, like velvet. Sometimes these discolor over time as they aren't always "archival grade" but if stored properly, they shouldn't fade.
Step 3: Position your insect against the foam board. I will sometimes measure out the exact center from the back, and push a pin through that center point so that I know the insect will be exactly where I want.
Step 4: Glue the pin into the foam board from the back if using a pin, or glue the insect directly to your background. You can cut a small piece of foam board and glue it between the bug and main board to create extra height if a pin isnt used. I like to use hot glue or E6000. Once the glue is dry, use pliers or wire cutters to cut the excess pin off of the back. You will be left with a dollop of glue which can be covered with a small square of wax paper that is squished down when the glue is still wet so that it lays flat. I glue this foam board piece to the frame backing or just use the foam board itself as the backing depending on the project.
Step 5: If your insect is shifting at all after you glued the pin down from the back, you can use a little super glue on the underside of the insect by the pin to secure it further. Tacking down limbs is also sometimes necessary to keep them in place. Just a tiny dollop of super glue will do the job!
Step 6: You're almost done, it's time to clean out the inside of the frame before closing it! Lots of dust particles and fuzz will magically appear when you start to look closely at your specimen and frame. I like to use canned air, lens wipes, and alcohol wipes to clean my frames and specimen/backing before closing up the frame.
Step 7: Caring for your specimen once it's all framed is very easy. Some general rules are to keep out of direct sunlight (sunlight can cause colors to fade and bleach your specimen), keep in a dry area, keep away from other insects (like ants or mites) as they might try to eat the specimen, and keep the container well sealed to keep out moisture and pests. If kept properly, a pinned insect or arachnid should last decades, if not centuries!
Supplies
(I am not sponsored by any of these suppliers)
The Bugs: Nowadays you can buy dried bugs on many online sites, however, if you are concerned with ethical sourcing, I recommend finding sellers that disclose their sources. Many sellers purchase bugs in bulk that have been euthanized specifically for pinning. I personally source most of my bugs from people whose pets pass naturally or ones I find deceased in nature, so finding a pet store or bug breeder may be a great option for you- or just getting outside and touching grass! If sourcing doesn't matter to you, I personally really like THIS Etsy seller for their variety and cost.
Foam: I get styrofoam blocks from recycling old packaging, but you can also buy styrofoam insulation sheets for shipping/insulation at many major stores across the US! Anything that you can push a pin into would work, so other types of foam are an option as well! My personal favorite is that purple insulation foam you can get from the hardware store. It's very dense and holds pins well!
Pins: You can purchase insect specific pins online or go to your local quilt/fabric store and use stainless steel dress pins! I like having a variety of sizes for different projects. Make sure the pins you are using are rust resistant as it stinks to put a ton of work into pinning an insect, only to have rust marks all over them!
Click here for a variety pack of pins
Wax Paper: Wax paper/vellum is super easy to find at any grocery or craft store! I use standard baking sheet wax paper from the market.
70% Alcohol: I personally purchase my bottles of rubbing alcohol at drug/grocery stores, but you can find bulk alcohol on sites like Carolina Biological or Amazon. Everclear also works great!
Frames: I personally love Michael's craft stores to find shadowbox frames. There are some very budget-friendly plastic frames, as well as nicer wooden frames. They also carry some cool jars and display boxes that could work for diorama-type displays. (I am not sponsored by Michael's, F*** Hobby Lobby, their frames are also absolute poop). I also find cool frames/display objects at thrift stores or antique malls and repurpose them, although these sometimes need a little bit of reworking/refinishing.